|
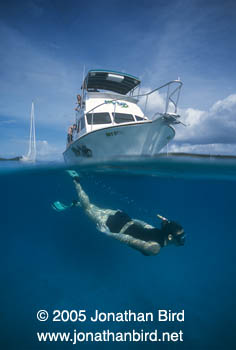
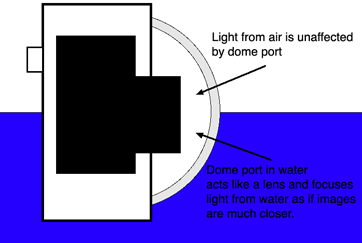
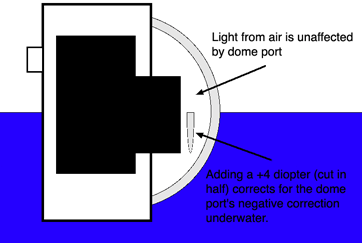
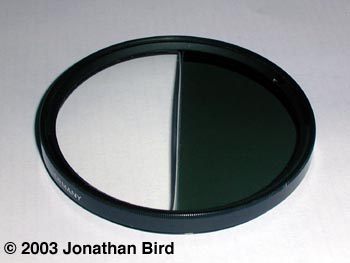
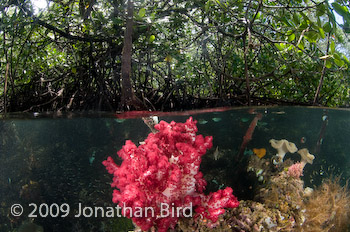
The split shot (a picture that is half above water and half underwater) can be a powerful approach to rendering many subjects in shallow water when there is something neat above water as well. Reefs with mountains or boats in the background, mangroves, or blue holes in the jungle are all wonderful places to shoot split shots. People who are not into underwater photography often don't realize how tricky it is to create images like this (unless you cheat and make them in the computer!) Underwater photographers know that creating split shots is a little trickier than it looks. The big problem in creating split shots is the fact that water and air have a different index of refraction. Therefore, if an object is at the same distance from the lens underwater as it is above water, the lens has to focus at two different distances. In general, one must use a wide angle lens to accomplish these shots. With a wide angle lens, you need a dome port on the housing to maintain the angle of view of the lens and to reduce distortion at the edges of the frame. Here's the problem: while a dome port has no major optical effects on the image above water, its spherical shape underwater acts like a negative lens, making objects appear to your camera as if they are significantly closer than they really are. For this reason, to use a lens behind a dome port requires that the lens be able to focus closer than roughly 4 times the radius of the curvature of the dome*. On a typical 8" dome port (radius=4"), the lens must be able to focus closer than 16". Since many lenses can't focus this close, use of a +2 diopter accessory "close up" lens is sometimes required. To do a split image, your lens might have to focus at infinity above water, but focus closer than 16" underwater (see figure 1). For many lenses, even at f/22, there simply is not enough depth of field to pull this off. (Fisheye lenses can manage. Most rectilinear lenses can't.) The solution is to use a "split" diopter (close-up lens on only the underwater half of the image). This means you have to actually get a diopter lens that has only a half circle of lens in it. (See figure 2). Although there have been places that make these in small quantity and sell these lenses ready-made, most people end up having to make their own. You have to buy a normal threaded diopter close-up lens in the filter thread size of your lens, remove the lens from the threaded ring, and then cut it in half. This is not something you should try to do yourself unless you have experience working with optics. I took mine to my local eyeglasses shop where they know how to cut lenses. I also had them buff the edge of the cut so it wouldn't produce glare. Next, you generally want to add a 2 stop neutral density (ND) filter to the other half of the filter. An ND filter is just a dark filter that drops the light level back by a precise number of stops. You usually need this because the image tends to be brighter above water than below. By dropping the exposure by two stops above water, you hopefully match the exposure above and below water. So, you get an ND filter in the right size and have the same place cut that in half. If you are lucky, you can make two filters from all the parts and sell one (or keep it as a spare). I have tried to use ND gelatin filters to keep the cost down, but my experience is that it's hard to keep flat and it gets all wavy in the mount. I prefer the somewhat more expensive but considerably higher quality route of using a glass ND filter cut in half to match the diopter cut in half. The finished product looks like mine, seen in figure 3. The final thing to consider here is the size of the dome used to create the shot. In general, the bigger the better. An 8" dome is great. Some companies make a 9" dome that is even better. The reason for using a large dome is twofold. First, the bigger the dome, the easier it is to get a smooth water line across the picture because it's easier to line up a large dome with the water, and small waves make less impact on your image. Second, the larger the dome, the further away the virtual image is underwater, and the easier it is to focus underwater and above water at the same time. This isn't to say you can't pull off a good split shot with a 6" dome, it's just a little harder. My experience is that a 6" dome requires the stronger +4 diopter and a 8" dome requires a +2 diopter lens. If you put a +4 on a large dome, it may be too much correction unless your underwater subject is very close to the lens. Good luck! Jonathan *This is a somewhat complicated concept, but there is a discussion of this at scubageek.com. Essentially, an object at infinity when shot through a dome port underwater produces a virtual image at a distance that is 3 times the dome radius minus 4 times the port thickness from the front of the port. Since lenses are calibrated to focus from their focal point and know nothing about the distance from the front of the port, the lens behind a dome port focuses on a virtual image that is 3*dome radius-4*dome thickness+1 radius inside the dome. This can be rounded to roughly 4 dome radii. |
|
Last Update 11/17/09
